
This page is an Open Source, living reference for my GetCoding students doing the NodeJS module. If you’d like to edit the content on this page, submit a PR to the markdown file on GitHub.

Anatomy of a Full-Stack App
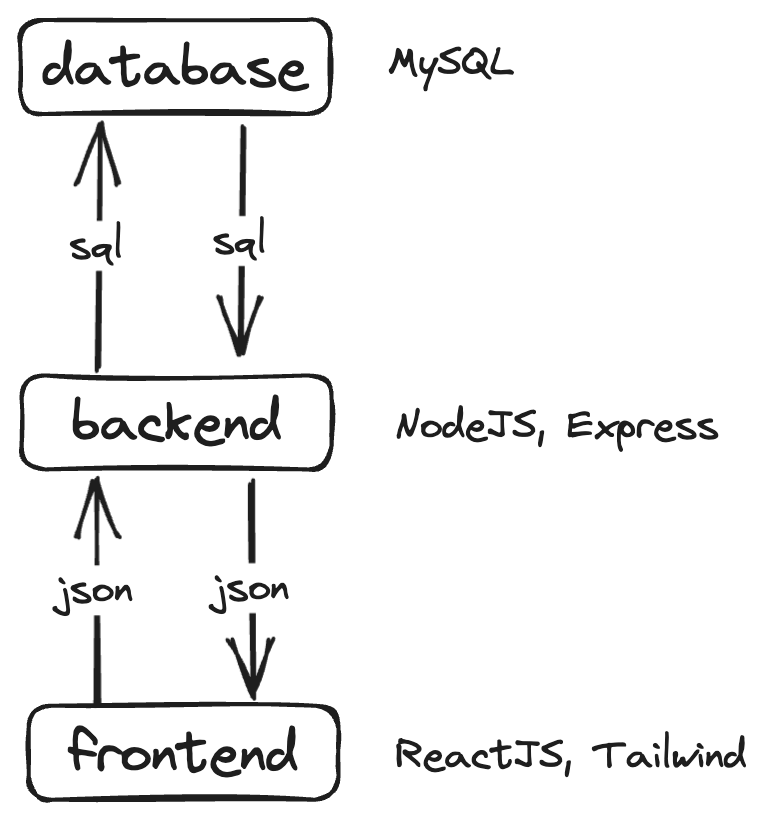
A stack is a collection of technologies that work together to build an app. A Full-Stack Developer works on the Frontend, Backend and Database.
The Frontend is the part of the app that runs in the browser. The Backend is the part of the app that runs on the server. The Database is the part of the app that stores data.
The stack we choose here make it a “SPA”, or Single Page Application. This means that the Frontend is a single page that is rendered in the browser.
Setting up React
1.1.1. How to setup React
We’ll use Vite to setup React. It’s a new build tool that is much faster, easier to user, and flexible than Create React App.
- Open your terminal and run the following command:
npm init vite@latest my-app -- --template react
- Open your terminal and run the following commands:
cd my-app
npm install
npm run dev
- Open your browser and go to
http://localhost:3000/. This should show a basic react webpage.
Hello world Vite.
1. Node JS
Node JS is a JavaScript runtime built on Chrome’s V8 JavaScript engine. Node JS uses an event-driven, non-blocking I/O model that makes it lightweight and efficient. Node JS’ package ecosystem, npm, is the largest ecosystem of open source libraries in the world.
What’s the difference between Yarn and NPM?
1.2.3. Yarn
Yarn is a package manager for JavaScript. It is used to install, update, and remove JavaScript packages. It is similar to NPM.
1.2.4. NPM
NPM is a package manager for JavaScript. It is used to install, update, and remove JavaScript packages. It is similar to Yarn.
Both Yarn and NPM are package managers for JavaScript. They both retrieve packages from the same registry. Yarn is a little faster than NPM. Yarn has a few extra features that NPM doesn’t have. NPM is a little more popular than Yarn.
Choose NPM for now, use Yarn when NPM gives you problems.
1.1. Installation
1.1.1. Windows
- Download the Windows installer from the Nodes.js® web site.
- Run the installer (the .msi file you downloaded in the previous step.)
- Follow the prompts in the installer (Accept the license agreement, click the NEXT button a bunch of times and accept the default installation settings).
1.1.2. Mac
- Download the Macintosh installer from the Nodes.js® web site.
- Run the installer (the .pkg file you downloaded in the previous step.)
- Follow the prompts in the installer (Accept the license agreement, click the CONTINUE button a bunch of times and accept the default installation settings).
1.1.3. Linux
- Open your terminal and run the following command:
sudo apt-get install nodejs
If that doesn’t work, install a better Distro or Google it.
1.2. Node JS Hello World
- Create a file named
hello.jsand add the following code:
console.log("Hello world");
- Open your terminal and run the following command:
node hello.js
This should print Hello world in your terminal. This is similar to the console in your browser. This is because Node JS is a JavaScript runtime built on Chrome’s V8 JavaScript engine.
What’s the difference between Browser JavaScript and Node JS?
1.2.1. Browser JavaScript
Browser JavaScript is very limited. It can only run in the browser and can only access the browser’s APIs. It can’t access the file system, it can’t access the network, it can’t access the operating system, etc.
1.2.2. Node JS
Node JS is a JavaScript runtime with a lot more capabilities. It can access the file system, it can access the network, it can access the operating system, etc. It can also run outside of the browser. This means that you can run JavaScript on your computer without opening a browser.
Browser JavaScript and Node JS are both JavaScript, but they are not the same thing. They are two different environments (runtimes) with different capabilities. Browser JavaScript is used to make websites. Node JS is used to make servers, games, tools, etc that run on your computer directly.
2. Express JS
Express JS is a web framework for Node JS. It is designed for building web applications and APIs.
What is a web framework?
2.1.1. What is a web framework?
A web framework is a collection of libraries and tools that make it easier to build web applications and APIs. It provides a lot of functionality out of the box so that you don’t have to write it yourself. This includes things like routing, templating, authentication, etc.
2.1.2. Why use a web framework?
Node JS has raw HTTP APIs that you can use to build web applications and APIs. However, these APIs are very low level. They are not very easy to use and they don’t provide a lot of functionality out of the box. This means that you have to write a lot of code yourself. This is why we use a web framework. It provides a lot of functionality out of the box so that you don’t have to write it yourself.
What is an API?
2.1.3. What is an API?
An API is an Application Programming Interface. It is a set of functions and procedures that allow the creation of applications which access the features or data of an operating system, application, or other service.
Ex: The DOM API is a set of functions and procedures that allow the creation of applications which access the features or data of the DOM.
2.1.4. What is a web API?
A web API is an API that is accessed over the web. It is a set of functions and procedures that allow the creation of web applications which access the features or data of an operating system, application, or other service.
Ex: A web API that allows you to access the features or data of a database.
2.1. Where to put an Express JS application
You can put an Express JS application anywhere you want. However it’s good in the beginning to colocate your Backend and Frontend code in the same repository. This means that you should put your Express JS application in the same directory as your React JS application.
What is colocating?
2.1.5. What is colocating?
Colocating is when your Frontend and Backend code are in the same directory. This is convenient because related code is in the same place. It also makes it easier to deploy your app because you only have to deploy one directory.
Option 1: [Preferred] Frontend in the root and backend in a folder inside the root.
my-app/
├── node_modules/
├── backend/
│   ├── node_modules/
│   ├── index.js
│   └── package.json
├── public/
├── src/
├── .gitignore
├── package.json
├── README.md
└── yarn.lock
Option 2: Frontend and backend in folders inside the same directory.
my-app/
├── backend/
│   ├── node_modules/
│   ├── index.js
│   └── package.json
├── frontend/
│   ├── node_modules/
│   ├── public/
│   ├── src/
│   ├── .gitignore
│   ├── package.json
│   ├── README.md
│   └── yarn.lock
├── .gitignore
└── README.md
2.2. Express JS Hello World
- Open your terminal and run the following command:
npm install express
- Hello World
const express = require("express");
const app = express();

app.get("/", (req, res) => {
  res.send("Hello world");
});
- Open your terminal and run the following command:
node index.js
- Open your browser and go to
http://localhost:3000/. This should printHello worldin your browser.
Hello World
What is a route?
2.1.6. What is a route?
A route is a section of Express JS code that handles a specific HTTP request. It is a section of Express JS code that handles a specific HTTP request.
Ex: The / route handles the GET request to /.
Can I use my terminal to make HTTP requests?
2.1.5. Can I use my terminal to make HTTP requests?
Yes. You can use the curl command to make HTTP requests from your terminal.
curl http://localhost:3000/
Response:
Hello world
3. MySQL
MySQL is a relational database management system. It uses SQL to query data, create tables, and insert data and is the most popular database model in the world.
What is a database?
3.1.1. What is a database?
Bad data causes businesses to fail, lose customers, and lose money. A database is a collection of data that is organized so that it can be easily accessed, managed, and updated.
What is a database?
3.1.2. What is a relational database?
A relational database is a database that stores data in tables. A table is a collection of related data entries and it consists of columns and rows.
Relations are established between tables by matching data in columns. This is done by creating a column in one table that contains data that exists in another table. This column is called a foreign key.
Why not use a NoSQL database?
3.1.3. Why not use a NoSQL database?
First, always bet on SQL. It has been here since the 70s and will be here for much longer. As will the relational model. It is a proven technology that has been used by millions of developers for decades.
Second, NoSQL databases have no schema. This means that you can store any data in any format in any table. This makes it very hard to query the data. It also makes it very hard to maintain the data. This is why NoSQL databases are not used in production.
3.2. Installation
3.2.1. Windows
- Download the Windows installer from the MySQL Community Downloads page.
- Run the installer (the .msi file you downloaded in the previous step.)
- Follow the prompts in the installer (Accept the license agreement, click the NEXT button a bunch of times and accept the default installation settings).
3.2.2. Mac
- Download the Macintosh installer from the MySQL Community Downloads page.
- Run the installer (the .pkg file you downloaded in the previous step.)
- Follow the prompts in the installer (Accept the license agreement, click the CONTINUE button a bunch of times and accept the default installation settings).
3.2.3. Linux
- Open your terminal and run the following command:
sudo apt-get install mysql-server
If that doesn’t work, install a better Distro or Google it.
3.3. MySQL for Developers
PlanetScale has a great MySQL for Developers course that you can follow to learn MySQL. It’s free and it’s the best resource I’ve found for beginners learning MySQL. It gently introduces you to MySQL and even dives into advanced topics near the end.
3.4. MySQL Hello World
- Open your terminal and run the following command:
mysql -u root -p
- Enter your password.
- Create a database with a name that matches your project name for consistency.
CREATE DATABASE my_app;
- Create a table for your users.
CREATE TABLE my_app.users (
  id INT NOT NULL AUTO_INCREMENT,
  name VARCHAR(255) NOT NULL,
  email VARCHAR(255) NOT NULL,
  password VARCHAR(255) NOT NULL,
  PRIMARY KEY (id)
);
- Insert a user into the table.
INSERT INTO my_app.users (name, email, password) VALUES ("John Doe", "john@doe.com", "password");
- Select all users from the table.
SELECT * FROM my_app.users;
You should see the user that you inserted in the previous step.
4. Authentication and Authorization
Authentication is the process of verifying who you are. Authorization is the process of verifying what you can do.
What is the difference between Authentication and Authorization?
4.1.1. What is the difference between Authentication and Authorization?
Think of Authentication as a keycard to a building. It verifies who you are. Think of Authorization as the permissions that you have in the building. It’s the act of stopping you from going into rooms that you don’t have access to.
First we need to setup express-session. This is a middleware that allows us to store data in the session. This is useful for storing data about the user. We can use this to store the user’s ID after they login. We can then use this to get the user’s ID on every request.
What is a middleware?
4.1.2. What is a middleware?
A middleware is a function that runs before your route handler. It can be used to modify the request and response objects. It can also be used to run code before your route handler.
Session vs. Cookies
4.1.3. What is a session?
Sessions are used to store data about the user. The session lives on the server and is identified by a session ID. The session ID is stored in a cookie on the client. This cookie is sent to the server on every request. This allows the server to identify the user.
Cookies are a way to store data on the client. Express-session uses cookies to store the session ID on the client. This allows the server to identify the user on every request. We look up the session ID in the database to get the user’s ID. We can then use this to get the user’s ID on every request.
Cookies and Sessions work together to store data about the user. Cookies are used to store data on the client. Sessions are used to store data on the server.
Why do we need to connect Express-session to MySQL?
4.1.4. Why do we need to connect Express-session to MySQL?
Express-session stores the session data in memory by default. This means that the session data is lost when the server restarts, logging the user out. So every change you make to the server’s code will log all users out which is very annoying for development.
We can fix this by connecting Express-session to MySQL. This allows us to store the session data in MySQL. The data will be stored in a table called sessions. This means that the session data will not be lost when the server restarts.
4.1. Setting up Express-session
- Open your terminal and run the following command:
npm install express-session express-mysql-session
- Open your
index.jsfile and add the following code:
import mysql from "mysql2/promise";
import session from "express-session";
import MySQLStore from "express-mysql-session";
import express from "express";

const url = process.env.MYSQL_URL!;
const connection = mysql.createPool(url);
const sessionStore = new MySQLStore({}, connection);

const app = express();

app.use(
  session({
    secret: "keyboardcat",
    store: sessionStore,
    resave: false,
    saveUninitialized: false,
  })
);
- Creating a login and register route
app.post("/login", async (req, res) => {
  const { email, password } = req.body;

  const [user] = await connection.query("SELECT * FROM users WHERE email = ?", [
    email,
  ]);

  if (!user) {
    return res.status(400).json({ message: "User not found" });
  }

  if (user.password !== password) {
    return res.status(400).json({ message: "Incorrect password" });
  }

  req.session.user = user;

  res.json({ message: "Logged in" });
});

app.post("/register", async (req, res) => {
  const { name, email, password } = req.body;

  const [user] = await connection.query("SELECT * FROM users WHERE email = ?", [
    email,
  ]);

  if (user) {
    return res.status(400).json({ message: "User already exists" });
  }

  await connection.query(
    "INSERT INTO users (name, email, password) VALUES (?, ?, ?)",
    [name, email, password]
  );

  req.session.user = user;

  res.json({ message: "Registered" });
});
What is a POST request?
4.1.5. What is a POST request?
A POST request is an HTTP request that is used to send data to the server. It’s distinct from a GET request which is used to get data from the server. GET doesn’t have a body, POST does which is why it’s used to send data to the server.
What is a 400 status code?
4.1.6. What is a 400 status code?
A 400 status code is an HTTP status code that means that the request was bad. It’s distinct from a 200 status code which means that the request was good.
See HTTP Status Codes for more information. Or see HTTP.cat for a list of HTTP status codes and a laugh.
What is a JSON response?
4.1.7. What is a JSON response?
JSON: JavaScript Object Notation
JSON is a lightweight data-interchange format. It is used to send data to the client. It is also used to send data to the server and can be used to store data in files.
A JSON response is an HTTP response that is used to send arbitrary JSON data to the client. It’s distinct from a HTML response which is used to send Webpages to the client.
HTML Response
HTML is used to send a webpage to the client.
HTML<html>
<h1>Hello World</h1>
</html>
JSON Response
JSON is used to send data to the client.
JSON{
"message": "Hello World"
}
Step-by-step notes on login and register
4.1.8. Step-by-step notes on login and register
- The user enters their email and password into the login form and clicks the login button.
email:
password:
- The browser sends a POST request to
/loginwith the email and password in the body.
POST /login HTTP/1.1
Host: localhost:3000
Content-Type: application/json

{
  "email": "john@doe.com",
  "password": "password"
}
- The server receives the request and looks up the user in the database.
SELECT * FROM users WHERE email = "john@doe.com";
- The server checks if the user exists.
if (!user) {
  return res.status(400).json({ message: "User not found" });
}
- The server checks if the password is correct.
if (user.password !== password) {
  return res.status(400).json({ message: "Incorrect password" });
}
- The server sets the user in the session.
req.session.user = user;
- The server sends a JSON response to the client.
HTTP/1.1 200 OK
Content-Type: application/json

{
  "message": "Logged in"
}
How to login using ReactJS
4.1.9. How to login using ReactJS
- Open your
App.jsfile and add the following code:
import React, { useState } from "react";

function App() {
  const [email, setEmail] = useState("");
  const [password, setPassword] = useState("");

  const handleSubmit = async (event) =>
    await fetch("http://localhost:3000/login", {
      method: "POST",
      headers: { "Content-Type": "application/json" },
      body: JSON.stringify({ email, password }),
    });

  return (
    <>
      <input
        type="email"
        value={email}
        onChange={(e) => setEmail(e.target.value)}
      />
      <input
        type="password"
        value={password}
        onChange={(e) => setPassword(e.target.value)}
      />
      <button onClick={handleSubmit}>Login</button>
    </>
  );
}
4.2. Securing your passwords
Storing passwords in plain text is a bad idea. If someone gets access to your database, they will have access to all of your users’ passwords. This is why we hash passwords. Hashing is a one-way function that converts a password into a hash. This hash can then be stored in the database in place of the password. This means that if someone gets access to your database, they will not have access to your users’ passwords.
What is a hash?
4.2.1. What is a hash?
A hash is a one-way function that converts a password into a hash. One-way meaning that you can’t convert a hash back into a password.
You can check if a password matches a hash by hashing the password and comparing it to the hash. If they match, the password is correct. If they don’t match, the password is incorrect.
You should never log, or store a password. It should always be sent across the network in plain text then immediately converted to a hash.
What is a salt?
4.2.2. What is a salt?
A salt is a random string that is added to a password before it is hashed. This makes it harder to crack the password. It also makes it harder to crack multiple passwords at once.
Without a salt, two users with the same password will have the same hash. This means that if you crack one password, you crack all of them. With a salt, two users with the same password will have different hashes. This means that if you crack one password, you don’t crack all of them.
4.3. Setting up bcrypt
- Open your terminal and install bcrypt:
npm install bcrypt
- Next, we’ll import bcrypt and set the salt rounds in
index.js:
const bcrypt = require("bcrypt");

const saltRounds = 10;
- [Registry/Change Password]: Hashing a password
Store the hash in the database instead of the password.
const hash = await bcrypt.hash(password, saltRounds);
- [Login]: Comparing a password to a hash
Compare the hash to the password in the database.
const match = await bcrypt.compare(password, hash);

if (!match) {
  return res.status(400).json({ message: "Incorrect password" });
}
This code replaces your existing code for hashing and comparing passwords. It uses bcrypt to hash and compare passwords. It also uses a salt to make it harder to crack the password.
Step-by-step notes on hashing and comparing passwords
4.3.1. Step-by-step notes on hashing and comparing passwords
- The user enters their password into the login form and clicks the login button.
password:
- The browser sends a POST request to
/loginwith the password in the body.
POST /login HTTP/1.1
Host: localhost:3000
Content-Type: application/json

{
  "password": "password"
}
- The server receives the request and looks up the user in the database.
SELECT * FROM users WHERE email = "john@doe.com";
- The server checks if the user exists.
if (!user) {
  return res.status(400).json({ message: "User not found" });
}
- The server compares the password to the hash.
const match = await bcrypt.compare(password, hash);

if (!match) {
  return res.status(400).json({ message: "Incorrect password" });
}
- The server sets the user in the session.
req.session.user = user;
- The server sends a JSON response to the client.
HTTP/1.1 200 OK
Content-Type: application/json

{
  "message": "Logged in"
}
4.4. Authorization
Now that we have authentication, we need to add authorization. This is the process of verifying what you can do.
What is a foreign key?
4.4.1. What is a foreign key?
A foreign key is a column in a table that references a column in another table. It stops us from adding data to the table that doesn’t exist in the other table. It also allows us to join the tables together to get data from both tables. You can also use it to delete data from both tables at once.
What is a join?
4.4.2. What is a join?
A join is a way to combine data from two tables. It is used to get data from both tables at once. It is also used to get data from one table that references data in another table.
What is a cascade?
4.4.3. What is a cascade?
A cascade is a way to delete data from multiple tables at once. It is used to delete data from a table that references data in another table.
When you delete data from users like so:
DELETE FROM users WHERE id = 1;
You also want to delete data from todos like so:
DELETE FROM todos WHERE user_id = 1;
But you don’t want to do this manually. You want to do this automatically. This is where a cascade comes in. It allows you to delete data from multiple tables at once.
You can do this with a cascade like so:
FOREIGN KEY (user_id) REFERENCES users(id) ON DELETE CASCADE
So when you delete data from users like so:
DELETE FROM users WHERE id = 1;
It will also delete data from todos without you having to do the second query.
4.4.1 Creating a todo model
Before we go ahead with Authorization we need a model to check against. This table can record anything you want, if you’re building a blog it can record the title, body, and user_id of the todo. If you’re building a social media app it can record the text, image, and user_id of the todo. If you’re building a todo app it can record the text, and user_id of the todo. You get the idea.
CREATE TABLE my_app.todo (
  id INT NOT NULL AUTO_INCREMENT,
  title VARCHAR(255) NOT NULL,
  body TEXT NOT NULL,
  user_id INT NOT NULL,
  PRIMARY KEY (id),
  FOREIGN KEY (user_id) REFERENCES users(id) ON DELETE CASCADE
);
4.4.2 Creating a todo
Now that we have a todos model we need a route to create todos. This route will be protected by authorization. This means that only logged in users can create todos. This is done by checking if the user is logged in before creating the todo.
app.post("/todo", async (req, res) => {
  if (!req.session.user) {
    return res.status(401).json({ message: "Unauthorized" });
  }

  const { title, body } = req.body;

  await connection.query(
    "INSERT INTO todo (title, body, user_id) VALUES (?, ?, ?)",
    [title, body, req.session.user.id]
  );

  res.json({ message: "Created todo" });
});
What is a 401 status code?
4.4.4. What is a 401 status code?
A 401 status code is an HTTP status code that means that the user is not logged in. It’s distinct from a 200 status code which means that the user is logged in.
See HTTP Status Codes for more information. Or see HTTP.cat for a list of HTTP status codes and a laugh.
Step-by-step notes on creating a todo
4.4.5. Step-by-step notes on creating a todo
- The user enters their title and body into the create todo form and clicks the create todo button.
title:
body:
- The browser sends a POST request to
/todoswith the title and body in the body.
POST /todo HTTP/1.1
Host: localhost:3000
Content-Type: application/json

{
  "title": "Hello world",
  "body": "This is my first todo"
}
- The server receives the request and checks if the user is logged in.
if (!req.session.user) {
  return res.status(401).json({ message: "Unauthorized" });
}
- The server creates the todo.
INSERT INTO todos (title, body, user_id) VALUES ("Hello world", "This is my first todo", 1);
- The server sends a JSON response to the client.
HTTP/1.1 200 OK
Content-Type: application/json

{
  "message": "Created todo"
}
4.4.3 Retrieving a todo
Now that we have a todo we need a route to retrieve it. This route will be protected by authorization. This means that only logged in users can retrieve todos. This is done by checking if the user is logged in before retrieving the todo.
app.get("/todo/:id", async (req, res) => {
  if (!req.session.user) {
    return res.status(401).json({ message: "Unauthorized" });
  }

  const [todo] = await connection.query("SELECT * FROM todo WHERE id = ?", [
    req.params.id,
  ]);

  if (!todo) {
    return res.status(404).json({ message: "Todo not found" });
  }

  if (todo.user_id !== req.session.user.id) {
    return res.status(401).json({ message: "Unauthorized" });
  }

  res.json(todo);
});
4.4.4 Retrieving all todos
Now that we have a todo we need a route to retrieve all todos. This route will be protected by authorization. This means that only logged in users can retrieve todos. This is done by checking if the user is logged in before retrieving the todos.
app.get("/todos", async (req, res) => {
  if (!req.session.user) {
    return res.status(401).json({ message: "Unauthorized" });
  }

  const [todos] = await connection.query(
    "SELECT * FROM todo WHERE user_id = ?",
    [req.session.user.id]
  );

  res.json(todos);
});
4.4.5 Updating a todo
Now that we have a todo we need a route to update it. This route will be protected by authorization. This means that only logged in users can update todos. This is done by checking if the user is logged in before updating the todo.
app.put("/todo/:id", async (req, res) => {
  if (!req.session.user) {
    return res.status(401).json({ message: "Unauthorized" });
  }

  const [todo] = await connection.query("SELECT * FROM todo WHERE id = ?", [
    req.params.id,
  ]);

  if (!todo) {
    return res.status(404).json({ message: "Todo not found" });
  }

  if (todo.user_id !== req.session.user.id) {
    return res.status(401).json({ message: "Unauthorized" });
  }

  const { title, body } = req.body;

  await connection.query("UPDATE todo SET title = ?, body = ? WHERE id = ?", [
    title,
    body,
    req.params.id,
  ]);

  res.json({ message: "Updated todo" });
});
4.4.6 Deleting a todo
Now that we have a todo we need a route to delete it. This route will be protected by authorization. This means that only logged in users can delete todos. This is done by checking if the user is logged in before deleting the todo.
app.delete("/todo/:id", async (req, res) => {
  if (!req.session.user) {
    return res.status(401).json({ message: "Unauthorized" });
  }

  const [todo] = await connection.query("SELECT * FROM todo WHERE id = ?", [
    req.params.id,
  ]);

  if (!todo) {
    return res.status(404).json({ message: "Todo not found" });
  }

  if (todo.user_id !== req.session.user.id) {
    return res.status(401).json({ message: "Unauthorized" });
  }

  await connection.query("DELETE FROM todo WHERE id = ?", [req.params.id]);

  res.json({ message: "Deleted todo" });
});
5. MVC Architecture
MVC stands for Model View Controller. It is a software design pattern that separates the data, logic, and presentation of an application. It is used to make applications easier to maintain and extend.
What is a software design pattern?
5.1.1. What is a software design pattern?
A software design pattern is a general, reusable solution to a commonly occurring problem within a given context in software design. It is a general, reusable solution to a commonly occurring problem within a given context in software design.
5.0. Folder structure
my-app/
├── node_modules/
├── backend/
│   ├── node_modules/
│   ├── index.js
│   ├── package.json
│   ├── src/
│   │   ├── controllers/
│   │   ├── models/
│   │   └── views/
│   ├── .gitignore
│   ├── package.json
│   ├── README.md
│   └── yarn.lock
├── frontend/
│   ├── node_modules/
│   ├── public/
│   ├── src/
│   ├── .gitignore
│   ├── package.json
│   ├── README.md
│   └── yarn.lock
├── .gitignore
└── README.md
5.1. Model
The model is the data of the application. It is the data that is stored in the database. It is the data that is sent to the client. It is the data that is received from the client. It is the data that is used to make decisions in the application.
Let’s create a model for our todos
backend/src/models/todo.js
const connection = require("../connection");

class ToDoService {
  async create(title, body, userId) {
    await connection.query(
      "INSERT INTO todo (title, body, user_id) VALUES (?, ?, ?)",
      [title, body, userId]
    );
  }

  async get(id) {
    const [todo] = await connection.query("SELECT * FROM todo WHERE id = ?", [
      id,
    ]);

    return todo;
  }

  async getAll(userId) {
    const [todos] = await connection.query(
      "SELECT * FROM todo WHERE user_id = ?",
      [userId]
    );

    return todos;
  }

  async update(id, title, body) {
    await connection.query("UPDATE todo SET title = ?, body = ? WHERE id = ?", [
      title,
      body,
      id,
    ]);
  }

  async delete(id) {
    await connection.query("DELETE FROM todo WHERE id = ?", [id]);
  }
}

module.exports = new ToDoService();
5.2. Controller
The controller is the logic of the application. It is the logic that is used to make decisions in the application. It is the logic that is used to make decisions in the application. It is the logic that is used to make decisions in the application.
Let’s import our model into our controller and use it to create a todo.
backend/src/controllers/todo.js
const ToDoService = require("../models/todo");

class ToDoController {
  async create(req, res) {
    const { title, body } = req.body;

    await ToDoService.create(title, body, req.session.user.id);

    res.json({ message: "Created todo" });
  }
}

module.exports = new ToDoController();
5.3. View
The view is the presentation of the application. In this case we’re building an API so our view is routes that return JSON. In other cases it could be a webpage, a mobile app, or a desktop app.
Let’s create a view for our todos
backend/src/views/todo.js
const ToDoController = require("../controllers/todo");

module.exports = (app) => {
  app.post("/todo", ToDoController.create);
};
5.4. The app
Now that we have our model, controller, and view we need to connect them to our app. This is done by importing our view into our app.
backend/src/index.js
const express = require("express");

const app = express();

require("./views/todo")(app);

app.listen(3000, () => {
  console.log("Server listening on port 3000");
});
This is a very simple example of MVC. It’s not perfect but it’s a good start. It’s a good start because it separates the data, logic, and presentation of the application.
6. Deployment
Deployment is the process of making your application available to the public. It is the process of making your application available to the public.
We’ll deploy our app to Fly.io. It’s a great service that makes it easy to deploy your app to the cloud. It’s also free for small apps.
What is the cloud?
6.1.1. What is the cloud?
The cloud is a network of servers that are used to store data and run applications. It is a network of servers that are used to store data and run applications.
First install Docker, then install the Fly CLI.
Installing Docker
6.1.2. Installing Docker
Windows
- Download the Windows installer from the Docker Desktop for Windows page.
- Run the installer (the .msi file you downloaded in the previous step.)
- Follow the prompts in the installer (Accept the license agreement, click the NEXT button a bunch of times and accept the default installation settings).
Mac
- Download the Macintosh installer from the Docker Desktop for Mac page.
- Run the installer (the .dmg file you downloaded in the previous step.)
- Follow the prompts in the installer (Accept the license agreement, click the CONTINUE button a bunch of times and accept the default installation settings).
6.2. Creating a Fly app
First we need to create a Fly app. This is done by running the following command:
flyctl apps create --name my-app
This will create a Fly app with the name my-app. You can change this to whatever you want.
6.3. Creating a Fly database
Next we need to create a Fly database. This is done by running the following command:
fly volumes create mysqldata --size 10 # gb
# Set secrets:
# MYSQL_PASSWORD      - password set for user $MYSQL_USER
# MYSQL_ROOT_PASSWORD - password set for user "root"
fly secrets set MYSQL_PASSWORD=password MYSQL_ROOT_PASSWORD=password
Now follow the rest of the instructions in the Fly MySQL guide.